
Traditional Monolithic Architecture
A monolithic application is built as a single and indivisible unit. Usually, such a solution comprises a client-side user interface, a server side-application, and a database. It is unified and all the functions are managed and served in one place.
Normally, monolithic applications have one large code base and lack modularity. If developers want to update or change something, they access the same code base. So, they make changes in the whole stack at once.

| Pros | Cons |
| Less cross-cutting concerns. Cross-cutting concerns are the concerns that affect the whole application such as logging, handling, caching, and performance monitoring. In a monolithic application, this area of functionality concerns only one application so it is easier to handle it. Easier debugging and testing. Monolithic applications are much easier to debug and test. Since a monolithic app is a single indivisible unit, you can run end-to-end testing much faster. Simple to deploy. When it comes to monolithic applications, you do not have to handle many deployments – just one file or directory. Simple to develop. As long as the monolithic approach is a standard way of building applications, any engineering team has the right knowledge and capabilities to develop a monolithic application. | Understanding. When a monolithic application scales up, it becomes too complicated to understand. Also, a complex system of code within one application is hard to manage. Making changes. It is harder to implement changes in such a large and complex application with highly tight coupling. Any code change affects the whole system so it has to be thoroughly coordinated. This makes the overall development process much longer. Scalability. You cannot scale components independently, only the whole application. New technology barriers. It is extremely problematic to apply a new technology in a monolithic application because then the entire application has to be rewritten. |
Microservices Architecture
A microservices architecture breaks it down into a collection of smaller independent units. These units carry out every application process as a separate service. So all the services have their own logic and the database as well as perform the specific functions.
Within a microservices architecture, the entire functionality is split up into independently deployable modules which communicate with each other through defined methods called APIs (Application Programming Interfaces). Each service covers its own scope and can be updated, deployed, and scaled independently.

| Pros | Cons |
| Independent components. Firstly, all the services can be deployed and updated independently, which gives more flexibility. Secondly, a bug in one microservice has an impact only on a particular service and does not influence the entire application. Also, it is much easier to add new features to a microservice application than a monolithic one. Easier understanding. Split up into smaller and simpler components, a microservice application is easier to understand and manage. You just concentrate on a specific service that is related to a business goal you have. Better scalability. Another advantage of the microservices approach is that each element can be scaled independently. So the entire process is more cost- and time-effective than with monoliths when the whole application has to be scaled even if there is no need in it. In addition, every monolith has limits in terms of scalability, so the more users you acquire, the more problems you have with your monolith. Therefore, many companies, end up rebuilding their monolithic architectures. Flexibility in choosing the technology. The engineering teams are not limited by the technology chosen from the start. They are free to apply various technologies and frameworks for each microservice. The higher level of agility. Any fault in a microservices application affects only a particular service and not the whole solution. So all the changes and experiments are implemented with lower risks and fewer errors. | Extra complexity. Since a microservices architecture is a distributed system, you have to choose and set up the connections between all the modules and databases. Also, as long as such an application includes independent services, all of them have to be deployed independently. System distribution. A microservices architecture is a complex system of multiple modules and databases so all the connections have to be handled carefully. Cross-cutting concerns. When creating a microservices application, you will have to deal with a number of cross-cutting concerns. They include externalized configuration, logging, metrics, health checks, and others. Testing. A multitude of independently deployable components makes testing a microservices-based solution much harder. |
There are several microservices frameworks that you can use for developing for Java. Some of these are:
- Spring Boot: This is probably the best Java microservices framework that works on top of languages for Inversion of Control, Aspect Oriented Programming, and others.
- Jersey: This open-source framework supports JAX-RS APIs in Java is very easy to use.
- Swagger: Helps you in documenting API as well as gives you a development portal, which allows users to test your APIs.
Others that you can consider include: Dropwizard, Ninja Web Framework, Play Framework, RestExpress, Restlet, Restx, and Spark Framework.
Microservices With Spring Boot
Spring Boot gives you Java application to use with your own apps via an embedded server. It uses Tomcat, so you do not have to use Java EE containers.
Spring Boot has all the infrastructures that your applications need. It does not matter if you are writing apps for security, configuration, or big data; there is a Spring Boot project for it.
Spring Boot projects include:
- Spring IO Platform: Enterprise-grade distribution for versioned applications.
- Spring Framework: For transaction management, dependency injection, data access, messaging, and web apps.
- Spring Cloud: For distributed systems and used for building or deploying your microservices.
- Spring Data: For microservices that are related to data access, be it map-reduce, relational or non-relational.
- Spring Batch: For high levels of batch operations.
- Spring Security: For authorization and authentication support.
- Spring REST Docs: For documenting RESTful services.
- Spring Social: For connecting to social media APIs.
- Spring Mobile: For mobile Web apps.
Why Spring Boot?
You can choose Spring Boot because of the features and benefits it offers as given here −
- It provides a flexible way to configure Java Beans, XML configurations, and Database Transactions.
- It provides a powerful batch processing and manages REST endpoints.
- In Spring Boot, everything is auto configured; no manual configurations are needed.
- It offers annotation-based spring application
- Eases dependency management
- It includes Embedded Servlet Container
How does it work?
Spring Boot automatically configures your application based on the dependencies you have added to the project by using @EnableAutoConfiguration annotation. For example, if MySQL database is on your classpath, but you have not configured any database connection, then Spring Boot auto-configures an in-memory database.
The entry point of the spring boot application is the class contains @SpringBootApplication annotation and the main method.
Spring Boot automatically scans all the components included in the project by using @ComponentScan annotation.
Spring Boot Starters
Handling dependency management is a difficult task for big projects. Spring Boot resolves this problem by providing a set of dependencies for developers convenience.
For example, if you want to use Spring and JPA for database access, it is sufficient if you include spring-boot-starter-data-jpa dependency in your project.
Note that all Spring Boot starters follow the same naming pattern spring-boot-starter- *, where * indicates that it is a type of the application.
Spring Boot Application
The entry point of the Spring Boot Application is the class contains @SpringBootApplication annotation. This class should have the main method to run the Spring Boot application. @SpringBootApplication annotation includes Auto- Configuration, Component Scan, and Spring Boot Configuration.
If you added @SpringBootApplication annotation to the class, you do not need to add the @EnableAutoConfiguration, @ComponentScan and @SpringBootConfiguration annotation. The @SpringBootApplication annotation includes all other annotations.
A sample code is shown below:
import org.springframework.boot.SpringApplication;
import org.springframework.boot.autoconfigure.SpringBootApplication;

@SpringBootApplication
public class HelloWorldApplication {
   public static void main(String[] args) {
      SpringApplication.run(HelloWorldApplication.class, args);
   }
}
The above is the directory structure for a typical Spring boot application which is a Persistence service which deals with database queries.
Prerequisites
Your system needs to have the following minimum requirements to create a Spring Boot application −
- Java 7
- Maven 3.2 OR
- Gradle 2.5
Spring Initializer
One of the ways to Bootstrapping a Spring Boot application is by using Spring Initializer. To do this, you will have to visit the Spring Initializer web page www.start.spring.io and choose your Build, Spring Boot Version and platform. Also, you need to provide a Group, Artifact and required dependencies to run the application.
Observe the following screenshot that shows an example where we added the spring-boot-starter-web dependency to write REST Endpoints.
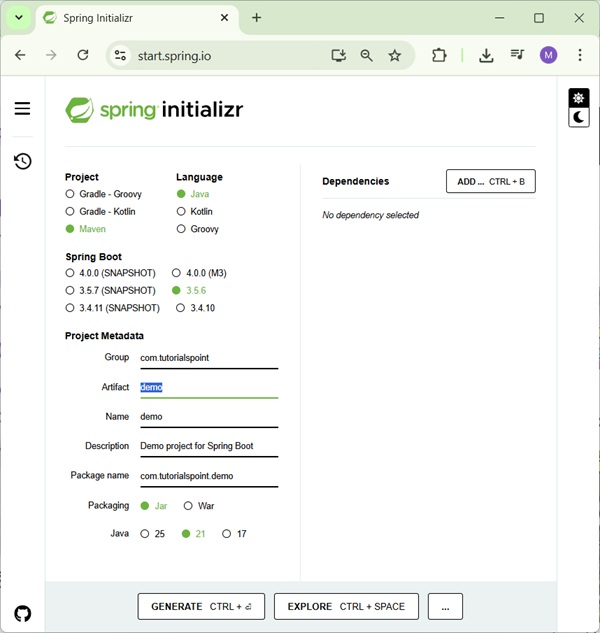
Once you provided the Group, Artifact, Dependencies, Build Project, Platform and Version, click Generate Project button. The zip file will download and the files will be extracted.
Below are the examples for using both Maven and Gradle. You can use any one of them for dependency management.
Maven
After you download the project, unzip the file. Now, your pom.xml file looks as shown below:
<?xml version = "1.0" encoding = "UTF-8"?>
<project xmlns = "http://maven.apache.org/POM/4.0.0"
   xmlns:xsi = "http://www.w3.org/2001/XMLSchema-instance"
   xsi:schemaLocation = "http://maven.apache.org/POM/4.0.0
   http://maven.apache.org/xsd/maven-4.0.0.xsd">

   <modelVersion>4.0.0</modelVersion>
   <groupId>com.tutorialspoint</groupId>
   <artifactId>demo</artifactId>
   <version>0.0.1-SNAPSHOT</version>
   <packaging>jar</packaging>

   <name>demo</name>
   <description>Demo project for Spring Boot</description>

   <parent>
      <groupId>org.springframework.boot</groupId>
      <artifactId>spring-boot-starter-parent</artifactId>
      <version>1.5.8.RELEASE</version>
      <relativePath/> <!-- lookup parent from repository -->
   </parent>

   <properties>
      <project.build.sourceEncoding>UTF-8</project.build.sourceEncoding>
      <project.reporting.outputEncoding>UTF-8</project.reporting.outputEncoding>
      <java.version>1.8</java.version>
   </properties>

   <dependencies>
      <dependency>
         <groupId>org.springframework.boot</groupId>
         <artifactId>spring-boot-starter-web</artifactId>
      </dependency>

      <dependency>
         <groupId>org.springframework.boot</groupId>
         <artifactId>spring-boot-starter-test</artifactId>
         <scope>test</scope>
      </dependency>
   </dependencies>

   <build>
      <plugins>
         <plugin>
            <groupId>org.springframework.boot</groupId>
            <artifactId>spring-boot-maven-plugin</artifactId>
         </plugin>
      </plugins>
   </build>

</project>
Gradle
Once you download the project, unzip the file. Now your build.gradle file looks as shown below −
buildscript {
   ext {
      springBootVersion = '1.5.8.RELEASE'
   }
   repositories {
      mavenCentral()
   }
   dependencies {
      classpath("org.springframework.boot:spring-boot-gradle-plugin:${springBootVersion}")
   }
}
apply plugin: 'java'
apply plugin: 'eclipse'
apply plugin: 'org.springframework.boot'

group = 'com.tutorialspoint'
version = '0.0.1-SNAPSHOT'
sourceCompatibility = 1.8

repositories {
   mavenCentral()
}
dependencies {
   compile('org.springframework.boot:spring-boot-starter-web')
   testCompile('org.springframework.boot:spring-boot-starter-test')
}